Streaming from a PC to the internet is relatively straightforward, but if you want to take a multi camera shoot to the world over the internet things get a bit more complex.
Here's a step by step guide on how to do it and what you'll need.
First of all you'll need all of the traditional trappings of a live production which agree likely to include two or more cameras, a live sound feed, a vision mixing desk and possibly an audio mixing desk.
Of course there are cables and Comms and tape decks for layoffs and for inserts and a graphics or caption generator.
So far, so traditional. Next comes the difficult part. You will need to get the feed from the mixing desk to the encoding software on your encoder.
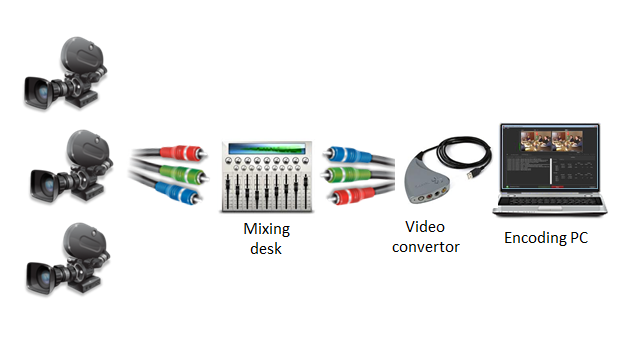
Generally this is achieved using a video card or a dedicated hardware box from companies such as Pinnacle, Viewcast Haupauge and Blackmagic. You can also use the existing video and audio inputs of a computer.
Depending on the connections used, you may have separate video and audio connectors. Some of the options include component video, composite video, SVHS and HDMI.
There are some packages that can offer both mixing and encoding, for example AVTake. There are also hardware mixer with built in streaming from companies such as Roland.
Once the signal is received by the encoder (usually a Mac or PC) then you will need to use software to encode the signal for the internet. The most commonly used software is Adobe Flash Media Live Encoder. This is free. However, there are some other applications out there which offer more advanced options, such as the ability to play in video files and add graphics downstream of your mixer output. These include Wirecast and VidBlaster.
To link the encoder with a media delivery network such as our own VidStorer, you will need the following parameters: primary streaming server URL, secondary streaming server URL and stream name. You may also need a username and password to secure your stream. Obviously you'll also need the URL for the resulting stream (or multiple URLs is the stream is being transcoded.
There are other settings you need to configure such as the video encode settings and the audio settings.
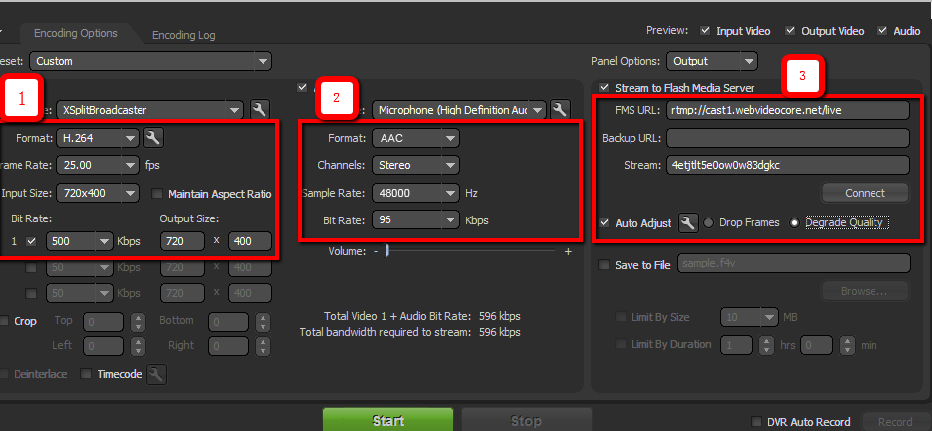
These are entered into the AFMLE interface and you press Start.
There are many nuances to the setup of the encoding, including the need to buy an MP3 plugin and encode using MP3 audio if you want to segment and deliver your stream to iOS devices. Your media delivery network partner should be able to help with the detail.
The MDN will probably also be responsible for the transcode of the feed to formats such as XML for adaptive bitrate and M3U8 for HLS delivery to iPads and iPhones.
Finally, you need to play out the feed. This involves setting up a player that can take and render the streams.
At TVEverywhere we have our own VZPlayer which you can set up using drag and drop and this will automatically roll between the various streams required depending on what device it's playing on.
And to answer an often asked question: no, unless you're a handful of NGOs, you cannot stream live to YouTube at the time of writing this.
If you need any help with your live event, please don't hesitate to contact info@tveverywhere.co.uk.